![]()
Installing DBcloudbin cannot be simpler. We do all the heavy lifting for you behind the scenes, with a wizard based setup. The installer will deploy the software, configure it, connect to your database, analyze your data model, identify those tables with binary content, present them for your selection (with the current net storage size of each one) and create the transparency layer in order to enable the transparent content movement to our Cloud Object Store.
Let’s go with the details… (additional configuration information is described in the setup tool itself; read carefully while installing).
Installation strategy
First thing first. Let’s discuss the main options:
- Marketplace 1-Click ready vApps. Definitely the simplest way to start with DBcloudbin. We have available ready to use virtual appliances in Azure, Google and AWS ready to just deploy to your Cloud subscription and start reducing your DB infrastructure costs! Check our marketplace section for details.
- Single server installation: This is the simplest ad-hoc setup, valid for small or test environments. In this case, we install everything in one server, that may be the database server or a different one. It depends on your own preferences and if your database is deployed in a DBcloudbin supported platform.
- Multi-server (clustered) installation: This is the recommended scenario for a production deployment where we need to provide high availability and horizontal scalability. In this case, we install the DBcloudbin agent in multiple servers, allowing the database to send requests to any of them. In this case, we have two additional options:
- DB in-host install: Assuming we have a DB cluster with more than one node we may install the DBcloudbin agent in each DB cluster host (providing it is a supported DBcloudbin platform from a OS perspective). This way, we simply configure each DB cluster host to connect to the local DBcloudbin agent; high availability is provided by the DB cluster itself. This is the simplest clustered setup.
- DB external install: In this scenario we install the DBcloudbin agent in several host nodes that are independent from the DB hosts. We do not require any clustering software. In this scenario, we need a network load balancer (NLB), hardware of software, providing the cluster name to be used by the database when sending requests to DBcloudbin agent (they are standard http(s) requests through a configurable port). So, if we configure the DBcloudbin agent to listen at default port 8090, and we setup three hosts where installing the agent, we need to configure a NLB with a FQDN (e.g. “dbcloudbin.myintranet.dom” in the load balancer that provide http balancing for incoming connections to port 8090 onto the three cluster nodes; in this scenario, we will configure the DBcloudbin setup providing “dbcloudbin.myintranet.dom” as the agent host and 8090 as the agent port).
This is the may decision to be planned when installing the software. Let’s see the supported platforms.
Supported platforms
An important topic to be clarified here is that by “supported platforms” we mean OS platforms where DBcloudbin software is installed, NOT OS platforms where the Database is installed. If your database is installed in a DBcloudbin supported platform, you have the option to install DBcloudbin in the same DB host; but if it is not, you can still use our solution, but installing it in a independent host that meets our supportability criteria. By ‘supported platform’ we mean platforms where we can accept and commit processing support requests; there is a much broader list of platforms where our software works (basically any modern version of Windows / Linux and many UNIX flavors) but we can only support in a best-effort model.
So, in summary, we have no restrictions on the OS platform where your Database run; just where our software is installed.
Please check our compatibility matrix for detailed information on the supported environments.
Installation modules
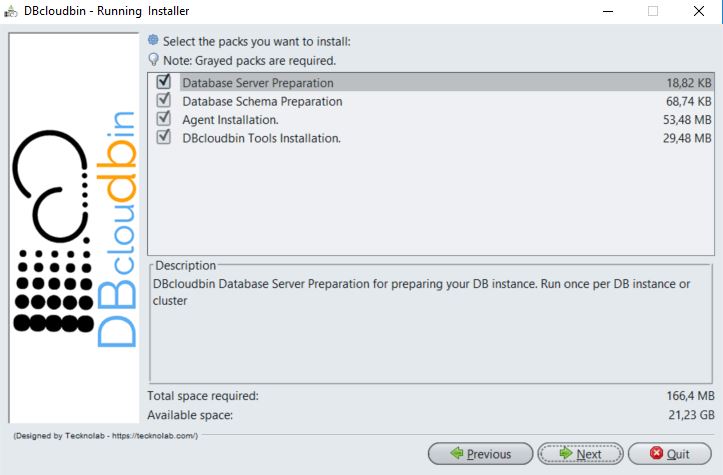
DBcloudbin setup installer is comprised of four modules, designed to be potentially executed several times, depending on your requirements and deployment strategy (due to this reason, we don’t register the installation in Windows registry and it does not appear in the server ‘Installed applications’).
- Database server preparation: Once per Database environment. Required as initial setup to have a functional environment.
- Database schema preparation: Typically once per Database schema (one application typically uses one database schema). Required for at least one schema (the schema where our application stores the data)
- Agent installation: One per host where the agent will be installed (depending on your setup strategy described above). Required in at least one host. It may be the same database host.
- DBcloudbin CLI installation: Command line interface (CLI) installation. Once per host or workstation where we need to execute the CLI.
When executing the installer, we can select or deselect those modules, so the installation comprises those parts required. In an initial test setup, we will typically select and install all the modules in a host.
Depending on the modules selected, the installation wizard will present the different information gathering panels and checks, in order to generate a correct installation.
If you are planning to install the agent in several hosts (either at the database hosts or independent hosts) it is important to activate the check of ‘Clustered agent installation’ (in Agent data panel if Database Server preparation module is selected) . This will ensure that all the agent instances in the cluster share and get notified any configuration change. If you already have a non-clustered installation and need to upgrade to a clustered setup, please go to your My-account section in our website and file a support request for configuration instructions through the CLI.
Information to be provided
As a summary, the information you need to collect in order to successfully deploy the solution is:
- DBcloudbin service license: You have to provide your service id and license. This information is generated once you order the DBcloudbin trial and will be sent to you by email. Access the here to request or, if already registered and ordered, here to get the order status and licensing information.
- Database dba credentials: Some setup processes (e.g. defining security configuration to allow the connection from the database with our DBcloudbin agent installed) requires dba privileges (sysadmin in SQL Server). This is ONLY required during setup. We will not store nor use those credentials during the solution operation; DBcloudbin will use a low-privileged database user to create a configuration schema and store configuration settings; this user is automatically created during setup with the password defined by you.
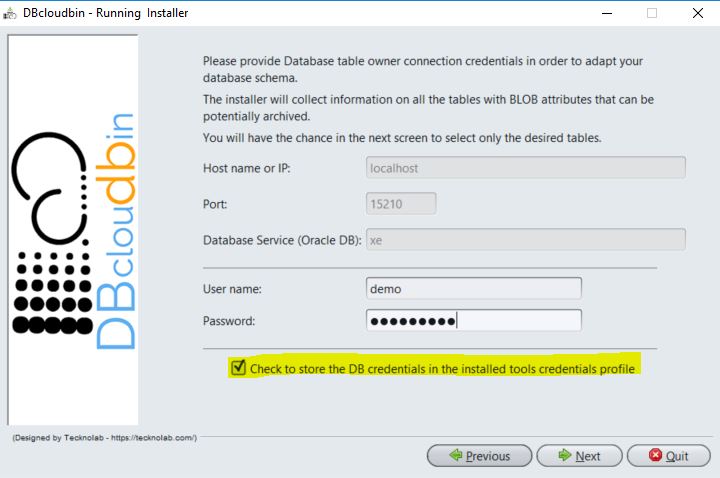
- Schema credentials: In order to automatically create the transparency layer for your application data model during setup, we require the database credentials for the user that is the application tables owner. The setup will automatically inspect the data model and identify those tables that has binary fields (BLOB attributes). Based on that list of tables, you will have the option to select all the tables or a subset of them. You will only be able to archive data from the tables you select at this stage. However, it is supported to re-run the installer again, select the module “Database schema preparation” and select additional tables from the same or different schema if you change your opinion and decide to move data from additional tables.
- Schema mode (transparency layer): In the schema credentials screen there is a check box for showing advanced parameters. If checked on, it displays the box for selecting the schema mode for the transparency layer, either “layered” (default) or “inline”. Check our detailed description of both modes and recommended scenarios at our schema mode post.
It is important to notice that the setup tool will NOT move any data to DBcloudbin Cloud Object Storage. The setup is only adapting the environment to enable this operation. For effectively moving data to the cloud, you have to execute the CLI (see below) either interactively or through a scheduled task at your server.
Windows installation
We provide a graphical user interface for the windows installer. Just double-click on the dbcloudbin-setup.jar and follow the installation instructions. The setup will request Administration rights in order to properly create the installation directory and install the agent service (a DBcloudbin-agent service is installed in the server when selecting the “Agent installation” module).
In the case you need to use a command line based installer (e.g. installing through a console interface) follow the following procedure:
-
- Open a Command Line console with Administration rights.
- Execute the installer through the command “java -jar dbcloudbin-setup.jar -console”
Important note for windows users:
When downloading the dbcloudbin-setup.jar file through a desktop or server with Microsoft Antimalware executable installed and active, the server may take a very long time analyzing the file and preventing its execution (the setup is a large java jar file packed as windows executable and Microsoft Antimalware is extremely inefficient analyzing these type of files). We recommend to close the browser used for downloading the file as a way to cancel the analysis. In the case of any issue downloading or installing our software, please, open a support ticket through the My account area and we will promptly provide an alternate download mechanism.
Linux installation
The Linux based installation is very similar to the Windows installation (the graphical interface is exactly the same) with the following caveats:
- You can use a command line or graphical interface for setting up DBcloudbin. As expected, the graphical interface is more intuitive but both provides the exact same results. Use the option -console for a console based interface.
- From a security perspective, we recommend to use a non-root user for installing DBcloudbin. The DBcloudbin-agent service will run using the user that executes the setup, so it is convenient to use a non-privileged user. However, during setup this user will require sudoable rights (with no password). Those rights can be temporarily granted during setup only (see the detailed instructions below).
- We require a systemd (systemctl) distro in order to setup the DBcloudbin-agent service correctly. If it is not available, the setup will fail.
Detailed recommended instructions:
- Create a linux OS user (e.g.):
sudo useradd –d /home/dbcloudbin dbcloudbin

sudo mkdir /home/dbcloudbin

sudo chown dbcloudbin:users /home/dbcloudbin
- Check that you have installed java 8 64bit. Otherwise install it from Oracle website.
java -version
- In order to run the installer graphical interface, you may need to enable xhost in your current session. E.g.:
xhost +
- Run a shell with dbcloudbin user
sudo su – dbcloudbin
- In order to run the graphical interface instead of the command one, you may need to set the DISPLAY variable to your local session (providing you are running a graphical linux interface):
export DISPLAY=:0.0
- Make it (temporarily) sudoable without password (procedure may vary depending on the linux distro). E.g.:
sudo /usr/sbin/usermod -aG wheel dbcloudbin
- Execute the installer
java –jar dbcloudbin-setup.jar
- Follow the setup instructions. If you want to change the default setup dir (/usr/local/dbcloudbin) you should create it previously (e.g. mkdir /opt/dbcloudbin; chown dbcloudbin /opt/dbcloudbin)
Checking the installation
Providing that the installation is successful (otherwise, please goto my-account and file a support request), we should check that the solution is working correctly.
The typical and most frequent source of problems is the connectivity from the database with the agent, the agent with DBcloudbin Cloud storage and the command line tool with the database and the agent. So we have to make sure that those connections are possible and there are no problems (routing / firewalling) preventing them.
So, in summary:
- Database hosts have to be able to connect to the agent through the defined port (8090 by default or the one defined at setup).
- DBcloudbin agent have to be able to connect through https (port 443) to https://app.dbcloudbin.com
- The CLI have to be able to connect to the database (using the configured credentials, see CLI section below). This typically suppose ability to reach the database listener in the configured port (by default in Oracle, 1521, SQL Server, 1433). The CLI has also to be able to connect to the agent using the same agent host name and port defined in the setup. So, if we configured “dbcloudbin.mycompany-intranet.int” as the agent host name in setup, the workstation or server where we execute the CLI has to be able to correctly resolve and connect to that DNS address.
Checking that everything is working properly:
- Verify that the agent have started OK after installation:
- Windows. Go to the Windows services and verify that the “DBcloudbin Agent” is installed and running. Go to <INSTALL_DIR>/agent and open the log file (dbcloudbin-agent_out.log). You should see a message like “Started LaunchClustered in xxx seconds (JVM running for xxx )”.
- Linux. Run systemctl status –l DBcloudbin-agent. You should see a state “active (Running)” and the log should show a message like “Started LaunchClustered in xxx seconds (JVM running for xxx )”
- Verify connectivity with the agent
- Now, check that you can reach the agent from other server (specifically from the DB host). If you cannot this may indicate a connectivity/firewall problem
- Open a browser from the database host and open http://<installation_agent_host_ip_or_name>:<agent_port>/rest/blob/read . This should generate a blank page without any http error. In any other case, please verify your communications / firewall setup. The agent port should be open in any active firewall (e.g. in the own host firewall; depending on your windows/linux flavor the correct configuration may vary).
- Verify connectivity with DBcloudbin Cloud Object Store.
- From the agent host, open a browser and connect to https://app.dbcloudbin.com/rest/blob/read. Again, this should generate a “blank” response with no http error. If you see any other error, please check your outbound internet firewall setup.
- If the checking is correct, just try using the CLI (it should be installed in <INSTALL_DIR>/bin). See the section below.
Uninstalling
We love that our customers use our technology but if they don’t want it, we ensure they have an easy way to restore their original setup, both in the DBcloudbin host and in the database. Upon install we put an uninstaller in the <INSTALL_DIR>/uninstall folder. Just double click or execute “java –jar dbcloudbin-uninstall-setup.jar” and follow the uninstaller instructions for restoring everything . After full uninstall you should only have the <INSTALL_DIR>/uninstall folder with the uninstaller jar. Just delete them manually.
If you have executed the setup several times (e.g. for installing agent instances in several hosts or for adapting several database schemas) you should run the uninstaller also several times, in the reverse order. (e.g. first uninstall the agent in all the additional hosts where you installed it and finally, uninstall the other modules; the “Database Server Preparation” should be in the last execution).
Once setup, DBcloudbin is easily managed through our CLI. In <install_dir>/bin you have a dbcloudbin command tool. Executing with no arguments you can see the different command verbs. Adding -help option to each command verb, you can see the detailed information on usage, options and arguments.
- Authentication
As we describe in greater detail in our security documentation, DBcloudbin integrates seamlessly with the own database authentication and authorization mechanism so, in order to execute commands to move back and forth content from your database and DBcloudbin Cloud Object Storage, you need to provide correct database credentials as schema owner (that is, the credentials of the datamodel owner; substantially, the ones provided for datamodel adaptation in DBcloudbin setup).
The simplest and more transparent way of doing this is maintaining checked the option provided in the schema model adaptation panel, as shown below in the setup screen figure. If checked, the setup will automatically store those credentials in the OS profile for the user that executed the installation (in the local host where the setup was executed). Those credentials are stored encrypted.
Alternatively, or in the case we have to manage several database schemas (e.g. we have several applications hosted in the same database each one with a different schema), we need to identify the credentials to be used for any archive / restore operation. This is done through the set-credentials verb where we associate a symbolic profile name to a set of credentials (that is, database, host, port, user, password). Once set-up just use the option -session <name> to define the session credentials we want to use. In the case we don’t define a name, those credentials will be considered as the default credentials.
- Info (provide general info for the installation and managed schema)
Executing “dbcloudbin info” within an authenticated session will provide us general information on the setup, as the running binary and DBcloudbin configuration database versions, the managed tables we selected during setup, the name of the ‘transparency layer’ schema/db where the links to the object storage is stored (see schema mode for details) and the name of the links tables in the transparency layer. This is just informational, during DBcloudbin CLI operations you should use always the original managed table name for any archive/restore/purge operations.
- Archiving (move data to DBcloudbin Cloud Object Store)
We use the “archive” verb to copy or move binary (BLOB) data from the managed tables to DBcloudbin Cloud Object Store. Copy or move is governed by the -clean option. We can opt by only copy the data to DBcloudbin Object Store but not deleting it from the database (acting as a sort of backup storage). Using the -clean option, we will effectively move the data, deleting if from the database. This is done through a very secure process to guarantee that the data is only cleaned from the database if it is completely secure at our repository (see our data integrity post for details).
The -where option gives a simple and effective way to provide an arbitrary criteria for defining the rows that will be affected by the operation, allowing us to define the subset of rows that we will move. The argument should be a valid SQL where clause based on our table attributes.
So, if our table “foo_table” that contains our BLOB data has a “modified_date” attribute of type datetime , we can execute an archiving command (and move data not modified in the last e.g. 30 days to DBcloudbin) by issuing (valid for Oracle):
dbcloudbin archive -clean foo_table -where "modified_date < sysdate - 30"
Including this command in a scheduled tool running for example daily, we will ensure our older data is moved to DBcloudbin to free up space in our database, while maintaining access to this information through our application as before.
- Restoring (move data back to our database)
The restore verb is the opposite to archive verb. With restore, we can move data back to our database, either because is a defined policy or because we want to uninstall the solution (we require a full restore of the information before executing a uninstall in order to avoid any data loss).
In the example above if we want to make sure that our hottest data is kept at the database, we should schedule a command like this:
dbcloudbin restore foo_table -where "modified_date > sysdate - 30"
If the data is already at the database, the command has no effects.
- Purging deleted content
In order to provide a simple and effective intrinsic backup mechanism, data is never deleted from the object store upon database deletions. This way, data deleted at the database keeps existing at the object storage; if we need to restore a database backup due to any data loss or corruption, the links to that data will be regenerated and would remain online as if it were restored in the database. The benefit is a much smaller backup and a much faster restore process since ‘fat’ content is not moved, just pointers restored.
When a BLOB object is modified or deleted by the application with a update or delete SQL sentence and the BLOB is already archived in the object storage (so a link to the BLOB is recorded) this link is automatically moved to a purged blobs table (it is automatically generated during setup in the transparency layer and called “dbcloudbin_purged_dbcldbn”). So the object remains unaltered in the object store. You have to explicitly issue a “dbcloudbin purge” to effectively erase the content from the object store. Purge command can receive a list of filter criteria options (the most important are table name and number of days since deleted) so we can easily create a purging scheduled job to purge the deleted objects aligned with our backup retention strategy (e.g. if we have a backup retention policy of 1 year, scheduling a purge job as “dbcloudbin purge -older 365” will ensure that any object deleted 1 year ago or earlier will be finally purged out from the object store.
We have described the main topics regarding DBcloudbin installation and configuration. In the case of doubts or problems, please don’t hesitate to fill a support request through you My-account section.
That’s all folks; go ahead and request your trial!